![]() Sponsored by PA Virtual Charter School.
Sponsored by PA Virtual Charter School.
By Andie Byron, Enrollment Specialist, PA Virtual Charter School
Summertime… and the livin’s easy… except when you have little ones around the house begging for some fun activities! We’ve gathered three sweet summer recipes that both kids and adults will enjoy.
Working together in the kitchen not only creates “together time,” it gives kids the chance to practice manual dexterity, measuring, following instructions, kitchen safety, and creativity. And of course, kids always get a kick out being able to see—and taste—the results of their work!
Now get out your kitchen aprons and have some fun!
1. “Instant” Peanut Butter-Banana Ice Cream
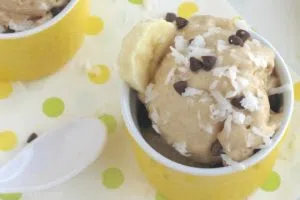 Courtesy of Two Healthy Kitchens
This creamy Peanut Butter-Banana Ice Cream takes just 5 minutes and uses only 5 ingredients. Both vegetarian and gluten-free, this no-churn treat is nutritious and delicious and can be enjoyed any time of day. Kids can do all of the main steps and can have fun pushing that blender button with adult supervision. Older kids can even help with scraping the sides and serving.
INGREDIENTS
- 3 peeled, frozen, overripe bananas (see note)
- 3/4 cup natural, creamy peanut butter
- 5 tablespoons nonfat milk
- Toppings: mini chocolate chips, shredded coconut, sliced fresh bananas
DIRECTIONS
- Break bananas in half and place them in a blender, along with the peanut butter and milk. Blend until creamy and smooth, scraping sides once or twice if needed.
- Serve immediately with chocolate chips, coconut, and banana slices.
Recipe Notes
Bananas: You want to use overripe, brown-speckled bananas for this recipe because they taste sweeter (just as those are the ones you’d want to use to make excellent banana bread).
2. Candy Dots with Kool-Aid
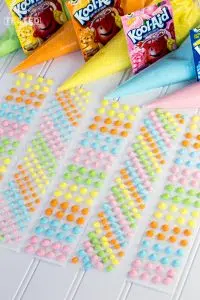 Courtesy of This Grandma is Fun and Smart School House
When it’s too hot outside, come inside and cool off with these fun Kool-Aid Dots Candy recipe. Kids can do all of the steps (depending on age) with supervision!
Even though it’s a no-bake recipe that only requires 3 ingredients, it’ll keep the kids (and you!) entertained for several hours. For added fun, find an old Kool-Aid commercial to see what the kids think of Kool-Aid man!
MATERIALS/INGREDIENTS NEEDED:
- Wax paper
- White or graph paper
- 5 cups powdered sugar
- 1 egg white (use pasteurized eggs) or egg white substitute
- 1/4 tsp Kool-Aid
DIRECTIONS:
- Cut wax paper and white paper into 2-inch strips. If tracing or drawing a picture, cut out a piece of wax paper and white paper the same size as the drawing or picture.
- If desired, draw designs on the white/graph paper.
- Tape the wax paper over the white/ graph paper.
- Using an electric mixer, whip the egg white and powdered sugar together for about 4- 5 minutes.
- Divide the mixture into 4-5 small bowls.
- Add your desired Kool-Aid powder to each bowl and stir until completely dissolved.
- Place the colored mixtures into plastic bags and snip one corner to make a small opening.
- Squeeze the mixture inside the bag towards the corner hole and make small dots on the wax side of your paper strips. Use the grid of the graph paper or the lines of the design to guide the placement of your dots and create different patterns.
- The candies will harden completely overnight, but you can still eat them when they are slightly squishy (that’s up to you and your kids!).
3. Marshmallow Treat Sushi
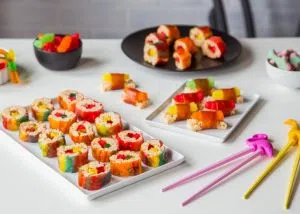 Courtesy of Jelly Toast
Whether your kids like sushi or just like sweets, this fun treat is bound to be a huge hit! You’ll have a ton of fun picking out candies, fruit leathers, and roll ups to use in your versions of these marshmallow treat sushi. This recipe—for sushi aficionados—is based on two different styles of sushi: nigari and maki.
You’ll use a bit more marshmallows in the crispy treat recipe, but that helps keep the marshmallow treats soft and easy to roll. It also makes them a bit stickier for long term storage, but placing some sheets of wax paper between the finished rolls does wonders to keep all the finished pieces intact!
While cutting and rolling the sushi pieces may require a little more dexterity than some younger children might have, selecting and placing the colorful twists, worms, and fish is plenty of fun!
INGREDIENTS:
- 1/4 cup unsalted butter, plus more to butter pan
- 1 – 10.5oz bag mini marshmallows
- 5 cups crisp rice cereal
- A variety of candy for sushi-making, including:
- fruit leathers, roll ups, tapes
- licorice twists
- gummy worms
- gummy fish or sour fish
DIRECTIONS
- Butter the bottom and sides of a rimmed baking sheet.
- In a large pot, melt butter over medium heat. Add marshmallows and stir until completely melted.
- Remove pot from heat. Add in cereal and stir until mixture is even. Spread mixture in a thin layer onto the buttered rimmed baking sheet. Allow to cool slightly.
- Use a knife to trim the uneven edges of the marshmallow treats.
- To Make Nigiri Sushi:
Cut small rectangles out of the marshmallow treats about the size of the gummy fish. Wrap a small piece of fruit leather tape around the fish and marshmallow treat. - To Make Maki Sushi:
Cut large rectangles out of the marshmallow treats. Lay a gummy worm and a licorice twist along the short side of one of the rectangle. Roll the marshmallow treat around the gummy worm and licorice. Trim extra marshmallow treat and use fingers to seal the edges around the sushi roll. Wrap a fruit roll up around the sushi roll, pressing to seal it into place. Using a sharp knife, slice off 1 inch pieces of sushi. - Store sushi in a sealed container in between layers of waxed paper for up to 2 days.